Saturday 29 December 2012

Sugarcrafting...

For the past few weeks I have been youtubing, reading and learning about sugar crafting. Partly because I am trying my best to improvise the skill I use to decorate cupcakes. On the journey of learning, I have discovered one particular book that helped me a lot; ' The Contemporary Cake Decorating Bible: Creative Techniques, Fresh Inspiration, Stylish Designs'.

Although most of the projects in the book focus on cakes, it is easily adaptable to the cupcakes and cookies. Inside, it is packed with information for beginners and novice like me and of course to the professionals alike.

Alhamdulillah, a recent opportunity arose that i was given a chance to experiment with new techniques that i learnt recently from the book. Although it was a simple project, i certainly enjoyed making them and I was definitely encouraged to explore and produce more...


Insya-Allah if you stay on with me... maybe next time i'll be showing you on how to make simple flowers like roses and poppies and hopefully it could help you to create a Wow factor to your cake.

Until then...

Monday 24 December 2012

Easy peasy baby tights tutorial

Seriously, this will only take 30-45 minutes of your time and with 0.5 metre fabric you could get 2 tights for your little one...

what do you need?
1. Stretch fabric/ jersey fabric/ old t-shirt fabric...
2. A readily made tights to act as a pattern
3. Tracing paper/ brown paper
4. Pen
5. Stretch needle fitted on your sewing machine. I use Klasse stretch needle.
6. Elastic waistband 3/4 inches.

Method :


1. Fold your tights in to half and lay it on the tracing paper. Mark around the tights leaving a 1/2 inches along the crutch's edge and 2 inches around the top and 3/4 inches for the bottom (for hem) of the tights.

2. Fold the fabric in to 2, and place the pattern on the fabric. Using the templates, cut two of these.

3. Overlock stitch the bottom of the tights and the top of the tights to prevent it from fraying.


4. Create a hem on the bottom of the tights, by folding 3/4 inches on the wrong side of the fabric and stitch the hem using the machine.


5. Pin the lower edge of the tights. Machine stitch the side edge of the tights.


6. Place one leg inside the other leg with right side facing. Pin around the crutch in V shape.


7. Machine stitch the crutch in V shape.

8. It should now look like a tights without a waistband.


9. Pin 1 inch hem on the top of the tights (wrong side facing), making sure the elastic waistband fits within the hem.


10. Machine stitch the hem at the waist area leaving 2 inches area unstitched to allow the elastic waist to be fitted within this area.


11. Measure the elastic band around the waist of baby. Cut 3/4 inches from the measurement. Place safety pin at the end of the elastic band.


12. Place the elastic band inside the hole through the unstitched area guided by the safety pin. Once the elastic band reaches the other side of unstitched area, push the elastic band out from the hole. Machine stitch both ends of the elastic band. I usually zig-zag stitch to create a stronger stitch.

13. Tuck the elastic waistband into the hole, sealed the unstitched area by stitching it.

14. Voila! your tights are ready... I am making another 2 today...


Wednesday 19 December 2012

Indulge me please... red velvet cake


I have been sampling multiple recipes of red velvet cakes for my cuppies, ranging from Magnolia Bakery to Rachel Allen, but yet unable to find the perfect one.... accidentally I have come across this recipe through internet from Baked Bakery; Matt Lewis and Renato Poliafito and they are certainly the best to date...


After sampling 2 recipes  I couldn't resist to get their book from Amazon; Baked Exploration... Seriously... for those avid bakers out there... this is the book to get.... So far.. I have tried three of their recipes and Alhamdulillah... not only they are easy to make, they also turned out well each time....
The cake itself is not too chocolatey, not too sweet, light and most importantly moist to my liking. To my disappointment, the suggested cinnamon frosting suggested in the book is a bit too sweet and is an acquired taste...


Red Hot Velvet Cake Layers:
1/4 cup dark unsweetened cocoa powder
2 tablespoons red gel food coloring (see note below)
1/4 cup boiling water
6 tablespoons or 3 oz unsalted butter, softened, cut into small pieces
2 tablespoons or 1 oz vegetable shortening, at room temperature
1 2/3 cups sugar
3 large eggs
1 cup buttermilk 
1 teaspoon pure vanilla extract
2 1/2 cups cake flour
1 teaspoon fine salt
1 tablespoon cider vinegar... I use distilled vinegar
1 teaspoon baking soda

if you do not have buttermilk, you could make it with....

1 cup milk + 1 Tbsp lemon juice- allow to stand for 5 minutes prior to usage.
or
1 cup milk + 1 tbsp vinegar- allow to stand for 1 minute prior to usage.

Red Hot Velvet Cake Layers:

1. Preheat the oven to 325 degrees F /160 C. Butter three 8-inch round cake pans, line the bottoms with parchment paper, and butter the parchment. Dust with flour, and knock out the excess flour.

2. In a medium bowl, whisk together the cocoa powder, food coloring, and boiling water. Set aside to cool. In the bowl of an electric mixer fitted with the paddle attachment, cream the butter and shortening until smooth. Scrape down the bowl and add the sugar. Beat until the mixture is light and fluffy, about 5 minutes. Add the eggs, one at a time, beating well after each addition.

3. Stir the buttermilk and vanilla into the cooled cocoa mixture. Sift the flour and salt together into another medium bowl. With the mixer on low, add the flour mixture, alternating with the cocoa mixture, to the egg mixture in three separate additions, beginning and ending with the flour mixture. Beat until incorporated. In a small bowl, combine the vinegar and baking soda and stir until the baking soda dissolves; the mixture will fizz. Add to the batter and stir until just combined.

4. Divide the batter among the prepared pans and smooth the tops. Bake until a toothpick inserted in the center of each cake comes out clean, about 30 minutes, rotating the pans halfway through the baking time. Transfer the cakes to a wire rack and let cool for 20 minutes. Invert the cakes onto the rack, remove the pans, and let cool completely. Remove the parchment.

Another project which is done recently is the Cinderella dress... Although the dress is done, I still think it is a bit too plain.... I have added some beads at the neckline area and thinking to add a flower details/flower brooch on the dress... What say you???


Wednesday 12 December 2012

Baju kurung: Part 2 Pattern


For many many years i have sewn baju kurung based on template copied from the previously made baju kurung. It is only recently I have learned to make the pattern properly. In fact, I have always had the intention to learn how to make a baju kurung and kebaya from a professional dressmaker. Unfortunately with me being here, the task seems impossible, but yet..... Alhamdulillah.....Somehow, Allah made it easy for me.... in which recently an opportunity arose and I was able to learn it in Belfast... kudos to my sifu; Mr Hasnan Mansor for making it possible for me to share this knowledge with you...

What do you need?
Tracing paper / brown paper
pencil
ruler

Method

Example of measurement taken in previous blog;

length of shoulder (Sh)                = 15"
Length of sleeves  (SL)               = 22"
Circumference of sleeves (CSL) = 10"
Chest (C)                                     = 34"
Waist  (W)                                   = 28"
Hip (H)                                        = 38"
Length of dress (L)                      = 29"
Length of skirt (Sk)                     = 39"

some malay terminology used in making baju kurung.

basi
kikik
pesak
leher
tangan

And here we go....


1. Mark the length of the dress on the paper. Measure from the right top end of the paper (29 inches).


2. Mark the shoulder point (Shoulder /2 = 15/2 = 7.5 inches)


3. Bring these two lines, 'shoulder' and 'length of the dress' together.


4. Mark Chest/4 - 1 inch on the shoulder line. C/4 - 1 inch = 34 /4 - 1 inch = 7.5 inch


5. Create a line on the level of C/4 - 1 inch using the formula Chest/4 + 1 inch = 34/4 + 1 inch = 8.5 inch.

6. Create a horizontal line from the ' dress length' using a formula Hip/4 + 2 inches = 38/4 + 2 = 11.5 inches.


7. Create pesak by joining the  (C/4 + 1 inch) line to the (H/4 + 2 inches) line.


8. Mark the sleeve point by measuring from the shoulder point; 22 inches.


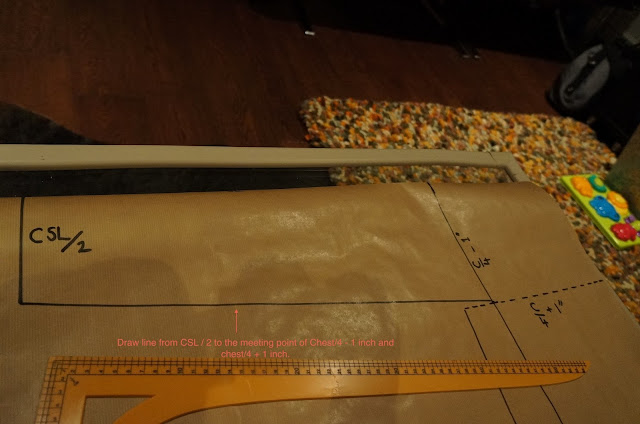
9. Create the sleeve width by using the formula, CSL/2 = 10/2 = 5 inches.


10. Draw a line from the end of CSL/2 to the C/4 + 1 inch.


11. Create a curve at the end of the dress using the curve ruler. Bring down the length of the dress by 1 inch.


12. Draw kekek  3 inches x 3 inches.


Creating leher is the most challenging part of baju kurung. However I will try to make it as simple as i can.... and hopefully you will find it easy insya-Allah...

1. create 3inches x 3 inches box at the right upper corner of the baju kurung pattern.


2. Create a quadrangle within the square with border 1 inch away from the upper, left and lower side of the square.


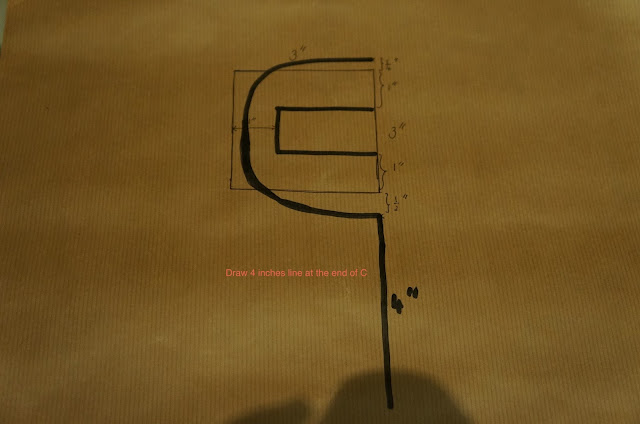
3. on another section of brown paper, draw 3 inches x 3 inches square to create template for leher.


4. Mark  "x" ; 1/4 inch from the  right upper end of the square.


5. Mark 'x' ; 1/2 inch away from the right lower end of the square.


6. Create a quadrangle within the square with border 1 inch away from the upper, left and lower side of the square.


7.  Draw a 'C' line ( does not need to be perfect though) from both of the 'x' points.


8. Draw a  4 inches straight line from the end of the 'C' line.


9. Finally, create a border around the neckline.


Yeay.... the pattern is now ready to be cut....


Monday 10 December 2012

The great discovery....

I know,  I know,  i still owe all of you the second part of the "making baju kurung".....A thousand apologies on my behalf... The truth is I have been busy this week with cupcakes, cakes and making a cinderella dress... oh dear....


Cupcakes ready to be collected.
  

The ongoing project of Cinderella dress... The bodice is finally done... Phew......


Giant Rainbow cupcake for little Adaleia

Anyway.... I was watching 'Jamie Oliver 15 minutes meal' the other day and i would like to share one great discovery in the programme... Believe it or not you could cook poppadom without frying using the microwave.... The secret is using high wattage microwave for 2 minutes and voila.... the poppadom is ready..... to my delight, hubby was enjoying the new finding so much that he had made few ones using the microwave last night to be eaten with nasi tomato.....
till then...