Thursday, 31 January 2013

Blind bake

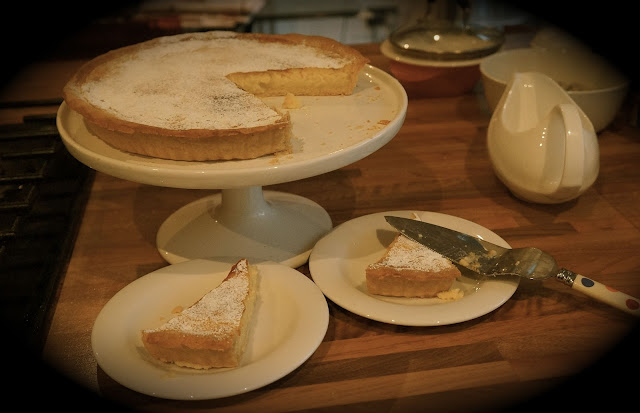
This is my second attempt of lemon tart... the first one was complete disaster with sourness to the extreme... this one turns out the way I like it... a bit sour, lemony and not too sweet...

I love tarts..... any tarts will do, but the best one has to be fruit tart. Making fruit tart seems complicated at the beginning, but once you have master the technique you could make any tart in the world.

Sweetcrust pastry case and blind baking technique.

Ingredients
200 mg plain flour
100 mg unsalted butter or butter, preferably cold butter
1 tbs icing sugar
1 large egg

Method
Mix the butter with  plain flour and icing sugar. Using your fingers, rub the flour with butter until it is breadcrumb like texture. If you have Magimix, you could mix this using the processor until it forms a breadcrumb like texture.

Add beaten egg and knead until it forms a dough.

Keep it refrigerate for at least 30 minutes. Please do not omit this step, as normal temperature dough will shrink when it is baked in the oven.

Take the pastry out from the fridge and roll the pastry to cover the tart tin (10 inches in size). Make sure you press the pastry tightly to the tin.


Dock the dough by piercing the pastry with fork to prevent bubbles from developing on the pastry.


Add parchment paper/ foil paper on top of the pastry.
Add ceramic balls/ pulses like dry rice or dry lentils on top of the parchment paper to prevent the pastry from rising through air bubbles.
bake for 15-20 minutes 180 degrees celcius.
Remove the pastry from the oven and remove the parchment paper and its content.
Bake again for another 2 minutes.
If you would like to make a normal crust pastry, omit the icing sugar and replace it with 1 tsp of salt instead.

ta ra.... the result....


Lemon tart recipe


Ingredients
1 cooked sweetcrust pastry case.
3 lemons (juice and grated zest, make it up to 150 ml of juice and water)
1 egg
115 g caster sugar
150ml double cream

Method
Mix the lemon juice, egg and caster sugar well.
Add the double cream into the mixture, mix well.
Slowly, pour the mixture into the cooked sweetcrust pastry case.
Baked for 35-40 minutes 160 degrees celcius.


On the lighter note, Aleesya is enjoying her new yellow tunic. The pattern is meant for size 12-18 months, but since she is on the small side, the tunic look a bit too big for her. She is now no longer shy with camera and will pose a cheeky smile when ever she sees a camera. The pattern is a purchased from http://www.etsy.com/shop/dmkeasywear and it is quite an easy project and easily adaptable to other design. I am looking forward making more of these in different fabric Insya-Allah. Until then.....

Wednesday, 2 January 2013

Roses are red in pictures...

Roses are red,
Violets are blue,
Sugar is sweet,
And so are you...


1. Knead the modelling paste into tube shape.

2. Diameter of the tube should be around 1-1.5 cm.

3. Cut the tube into 4 parts, with 3 parts 1cm in length and the 4th part 2.5 cm in length. Knead the 3 parts into 3 individual ball and the 4th part into a tube shape.


4. Using your thumb, smooth the edges of the balls and the tubes.


5. Roll the tube to form the rosebud.

6. Add the round petal on the inner side of the rosebud.

7. Add the second round petal on the inner side of the first petal. Repeat the process for the third petal.

8. Yeay! The rose flower is done and ready to be dried....

Peony in love....

This flower seems difficult to make.... however with patience and time, it certainly creates an impressive look to your cake...

What do you need?


Flower paste or modelling paste in red
scissors or cutting wheel
large 5 petal blossom cutter
foam pad
a ball tool / I just use the round knob of a pen as i don't have the proper ball tool
tooth pick
former cup/ i just constructed mine using foil paper placed in a cup
sugar glue
paper towels

Method


1. Thinly roll out the modelling paste. 
2. Cut 2 large 5-petal blossoms.


3. Cut small  sections from the petal edges in V shaped.


4. Veined the petals with tooth pick.


5. Place the petals on the foam pad, and soften the edges with the knob of the pen.


6. Place the petals on the former cup.
7. Repeat step 3-5 to the other set of petals.
8. Apply sugar glue to the centre of the petals on the former cup. Place the second set of petals on top of the first one. Add paper towel in between the 2 sets to create space between the 2 layers. These 2 layers will become the outer layer of the peony.


9. Now cut another 5 sets of 5-petal blossom. Cover all 4 flowers under the glass to prevent them from drying.


10. Repeat step 3-5. Fold the edges of each petal to the centre.


11. Fold again each petal to the centre but this time in upward manner. Pinch the base of the petal so that they are stable and in place.


12. Apply sugar glue to the base of the prepared outer petals. Place the petals in the centre of the prepared outer petals.


13. Repeat step 10 to 12 to the rest of the cut 5-petal blossoms.
14. Add twisted paper towel in between the petals to create space among the petals.


13. voila they are done and let them dry....

Sugarcrafting here and there....

I have to admit, when I first started sugar crafting, my knowledge about it was completely zero. I even thought that fondant is another name for marzipan.... Little did I know that marzipan is made from   almond and fondant is from icing sugar.

Fondant is very sweet and often used as outer covering of the icing of cake. It is however more elegant and more often used as a decorative tool to cover unusual cake shapes. As marzipan is made from almond, it tastes better and is often  used to line a fruit cake to seal the moisture and prevent staining to the fondant. So if you are lining a fruit cake, it is a must to line it first with a marzipan, followed with fondant on the outer layer. Whereby when you are lining a sponge cake, you could use either fondant or marzipan as the outer layer. However some bakers used both, the inner marzipan and the outer fondant to give a smooth effect on the outside.

Once cake is lined with fondant, it is best to keep it in a box at room temperature. Do not store the cake in the fridge since it tends to soften the fondant and turn it into a goey texture.

Just a little bit knowledge on quantity of fondant or marzipan needed to cover a cake when rolled to 5mm thickness...

size                             type of cake                      quantity needed

8 inches                      round                                900g
8 inches                      square                               1000g
9 inches                      round                                1000g
9 inches                      square                               1250g

So enough of my ramblings and straight to the tutorial today; :) I normally just buy the prepared fondant from the shop rather than making them myself. However, if you would like to make it yourself, here is the recipe.

Fondant recipe (makes 1 kg)
60 ml cold water
1 sachet powdered gelatine
125ml liquid glucose
15ml glycerine
1kg icing sugar

Method
1. Place water in the bowl, sprinkle over gelatine and soak until spongy. Stand the bowl over a hot saucepan with water and stir until the gelatine is dissolved. Add glucose and glycerine until blended.
2. put the icing sugar in large bowl and make a well in the centre. Add liquid ingredient in the middle.
3. turn out the the content of the bowl into a surface dusted with icing sugar. Knead the paste until it is smooth.

The fondant can be used immediately or be kept in the air tight container for 2 weeks. I normally keep mine in a sealed plastic bag and store it in the plastic container.

In order to create decorations to the cake lined by fondant, "modelling paste" is used. Modelling paste are more versatile paste which keeps its shape better and dries harder than sugarpaste fondant. So to create flowers for cake decoration you need to use modelling paste.

Modelling paste recipe (Makes 4oz)
4oz fondant
1/2 tsp gum tragacanth

Make a well in the fondant, add gum tragacanth and kneed well and wrap the modelling paste with plastic bag for 1 hour before used.

note: if your modelling paste is too soft, add a pinch or two gum tragacanth to harden it
         if your modelling paste is too hard, add a pinch of vegetable shortening or cooled water to soften
         it.

Sugarpaste gum
You could create your own gum by mixing small amount of fondant with hot water. Mix it well until you form a sticky paste.